Growing mushrooms may seem daunting, but it is quite simple. Most people resort to subreddit or Shroomery threads to ask about how to get started, but these threads can get confusing fairly quickly with the myriad of teks (short for techniques) that are available. This guide will recompile information from a variety of sources to provide you a comprehensive guide that teaches you how to grow magic mushrooms at home!
As you search for information on how to grow magic mushrooms, you may encounter the word tek a lot. This is simply a way to describe a certain protocol / technique that is used to grow mushrooms. In this article, we are going to keep things simple and focus on the classic PF Tek.
This is an easy way to start learning how to grow magic mushrooms without the need for a lot of space or equipment. Sure, there are many other teks that people prefer and some may say PF Tek is “outdated,” but it is honestly a classic way of growing. Unless you are wanting to do a bulk grow yielding many ounces, you’ll be fine following this.
Mushroom Life Cycle
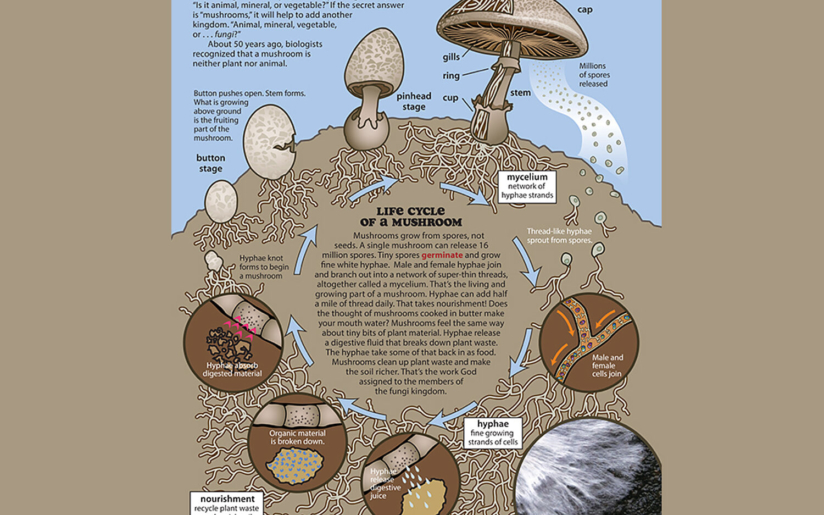
First things first, let’s have a quick lesson on how mushrooms grow. Mushrooms grow from spores, which are microscopic reproductive cells. In nature, millions of spores are dispersed and eventually germinate when the right conditions in soil are found. Once a spore germinates, it begins growing thread-like structures called hyphae. Male and female cells from different spores then join and begin forming a complex network of threads called mycelium.
Read: What are psilocybin spores? Everything you need to know and grow
The mycelium threads then begin releasing digestive juices to break down organic material in the soil. Hyphae then absorb the digested material and, with time and resources, begin forming something called a hyphae knot. This is the beginning of a mushroom forming. A hyphae knot is simply hyphae threads compacted into a minuscule knot which continues to grow and compact itself until it reaches the button stage.
The button then begins to push open allowing the stem to grow and enters the pinhead stage, where you start seeing very small baby mushrooms form. As hyphae threads / mycelium continue to compact and move upward, it begins forming a mature fruiting body and eventually forms the mushroom you know and love. A mushroom is simply a bunch of mycelium threads tightly compacted into the mushroom form.
Now that you got your daily dose of biology, let’s get started on learning how to grow magic mushrooms!
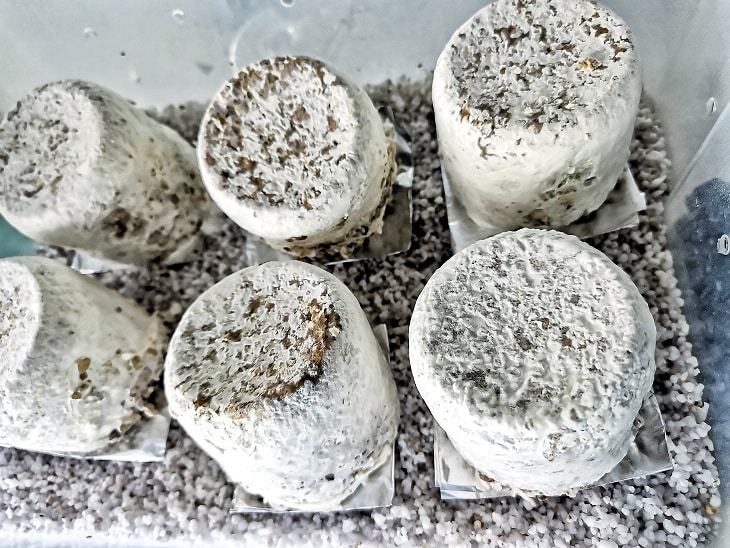
We will be making mycelium “cakes” in this article. A cake is a cylinder of nutrients colonized and compressed by a layer of mycelium. Let’s get started!
HOW TO GROW MAGIC MUSHROOMS
Things needed for 12 cakes:
- Spore syringe (Swabs won’t work for this tek)
- 5 qts (6 cups) of Vermiculite (Fine grade)
- 16 quarts of Perlite
- 75 qts (3 cups) of Brown rice flour
- 75 qts (3 cups) Filtered water
- 12 ½ pint wide mouth mason jars
- Micropore tape
- Pressure cooker (or extra-large pot)
- Lighter
- 1 64-quart plastic storage bin
- Silica packets
- Dehydrator (optional)
- 1 pressure cooker wire rack (optional)
Cost breakdown:
Necessary:
- Vermiculite: ~$19.99
- Perlite: ~$25
- Brown rice flour: $10
- Water: $2
- Mason jars: $13
- Micropore tape: $8
- Spore syringe: $15-20
- Storage bin: $15
- Silica packets: $7
Total: $120
Optional:
- Pressure cooker: $40
- Dehydrator: $40
Important tips before we start:
- Make sure you get wide mouth mason jars. Anything else will make your mycelium cake get stuck and unable to be removed from the jar.
- Water quality is said to matter. Use filtered water rather than tap to prevent the possible introduction of unwanted organisms.
- If you cannot find brown rice flour, you can make it at home with a cheap coffee grinder. Simply grind brown rice into a fine powder. Doing this on the blender may not give you a fine enough powder, so a grinder is recommended. You can also use a mortar and pestle, if you are about that life. It is said that freshly ground rice flour works best.
- Maintain an impeccable hygiene protocol while doing this. Make sure the area you are working in is thoroughly cleaned and disinfect it. You do not want to introduce the possibility of any sort of contamination. Work in a still room, if possible. I personally turn off my AC to prevent air flow while I’m working on the inoculation stage. Cleanliness is key!
Read: How long do shrooms last?
INSTRUCTIONS
Step 1: PREPARE YOUR MASON JARS
- You need to add four holes to the metal lids of your mason jars. Four holes in the cardinal directions: one hole where north is, another south, then east, then west. You can either drill these holes using a small drill bit, or by using a nail and hammer to puncture the holes.
- Seal the holes with micropore tap and set your jars aside for now.

Step 2: ADD VERMICULITE
- In a large bowl, add your 6 cups of vermiculite. Fine grade vermiculite is dusty, so wear a mask to prevent the inhalation of the dust. Additionally, follow proper handling instructions included on the back of your vermiculite package, as some may require the use of gloves.
Step 3: ADD WATER
- Slowly add about 75% of your water while mixing with a large spoon. This is a crucial step. We are aiming for vermiculite with good field capacity. This simpy means how much water the vermiculite can hold. While adding the water, periodically check the field capacity by grabbing a handful of wet vermiculite and squeezing it. You are aiming for your vermiculite to keep its shape while there being a little water being released when squeezed. If too much water runs, that means it is over field capacity and it is too wet. If your vermiculite is crumbly when squeezed, then you are under field capacity and you need to add more water.
Step 4: ADD BROWN RICE FLOUR
- Add your 3 cups of brown rice flour and mix very well. Your damp vermiculite should be covered in your brown rice flour.
Step 5: FILL YOUR MASON JARS
- Loosely fill all 12 of your jars while leaving a ½ – ¾ inch space at the top, basically the space that the lid takes. Fill this empty space with regular vermiculite (nothing added to it). This layer of vermiculite will act as a defense mechanism to prevent contamination from entering your jars and mycelium.
- Clean up your jars and screw your modified lids on them.
- Cover your jars with a small square of aluminium foil.

Step 6: STERILIZE YOUR JARS
- You want any contaminants that were in the environment to be completely removed. To do this, we will sterilize our jars using a pressure cooker or a large pot. I think using a pressure cooker is easier and faster, but if you don’t have one, then use a large pot.
- Place a wire rack at the bottom of your pressure cooker or pot – make sure the diameter fits that of your pressure cooker/pot. DO NOT simply put the jars touching the bottom of your pot – this is dangerous and can cause your jars to shatter due to the temperature and pressure differences. If you don’t have a wire rack, you can use extra mason jar lids placed at the bottom to give you that space.
- Place your jars in your pot or pressure cooker. Since we are making 12 cakes, you may need to sterilize in two batches, since there may not be enough space for all 12.
- Add enough water to cover the bottom of your pot touching just the bottom of your jars. You do not want water to get inside of them.
- If using a pressure cooker: sterilize for 45 minutes at 15 psi
- If using a pot: sterilize for 90 minutes, constantly refilling water that is lost due to evaporation.
- Let cool to room temperature (usually 5 hours). Do not place your jars in the fridge. Just let them come to room temperature on their own. IF YOU RUSH, you run the risk of inactivating the spores due to high heat and then growing nothing. Be patient.
Read: Lemon Tek: Everything you need to know about this trendy way of consuming magic mushrooms
Step 7: INOCULATE YOUR JARS
- Once your jars come to room temperature, you will introduce your spores into your jars. This step is called inoculating. A CLEAN ENVIRONMENT IS IMPERATIVE!
- Many people use a still air box to prevent any contamination at all. I will be honest and say that I have not used this. I clean my space incredibly thoroughly, turn off my AC and make sure there is no walking around me to prevent the air from moving. I have not ran into any issues with contamination doing it in the open air, but I take my precautions and treat my space as a pristine laboratory. Choose your method.
- Wash your hands thoroughly with antibacterial soap. Put some gloves on. Maybe even a mask. I am serious — take this step seriously.
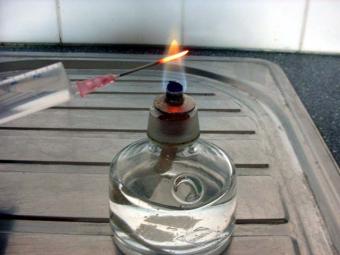
- Lay out your area neatly and organized. You will need: a lighter and your spore syringe. An alcohol lamp with a constant source of fire can make your job very easy, or a Zippo lighter. But a normal lighter works fine, too.
- Shake up your syringe to break up the spores.
- Heat up your syringe until it is red hot. Once it is red hot, let it cool down a couple of seconds.
- You are going to inject your syringe into each of the four micropore holes we made earlier. Do not remove the micropore tape – you will poke your syringe through it.
- Inject 0.25-0.4cc (mL) of your spores into each hole about 2-3cm deep. Each jar will take about 1mL of spores. I have had success with as little as 0.5-0.75mL before.
- Sterilize your syringe EVERY TIME BEFORE you inject it into a new jar.
- Inoculate all of your jars.
- Properly dispose of your needle.
- The hard step is done!
Step 8: INCUBATE YOUR JARS AND WAIT
- Place your jars in a dark, warm place. Around 23.3°C – 24.4°C / 74°F – 76°F is ideal. I have cabinet space above my refrigerator where I keep my jars, for example.
- Leave your jars alone for the next 2-3 weeks. I recommend not peeking at them. Maybe only check on them once every 1-1.5 weeks to see how they’re progressing.
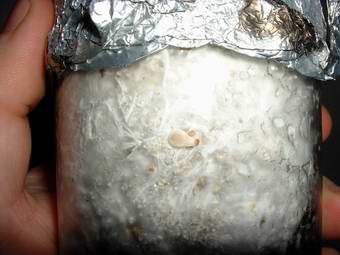
- You are aiming to see your substrate be completely colonized with mycelium. They will look bright white with very little, if any brown vermiculite/brown rice flour showing.
- Wait until your jars are completely white.
Step 9: PREPARE YOUR FRUITING CHAMBER
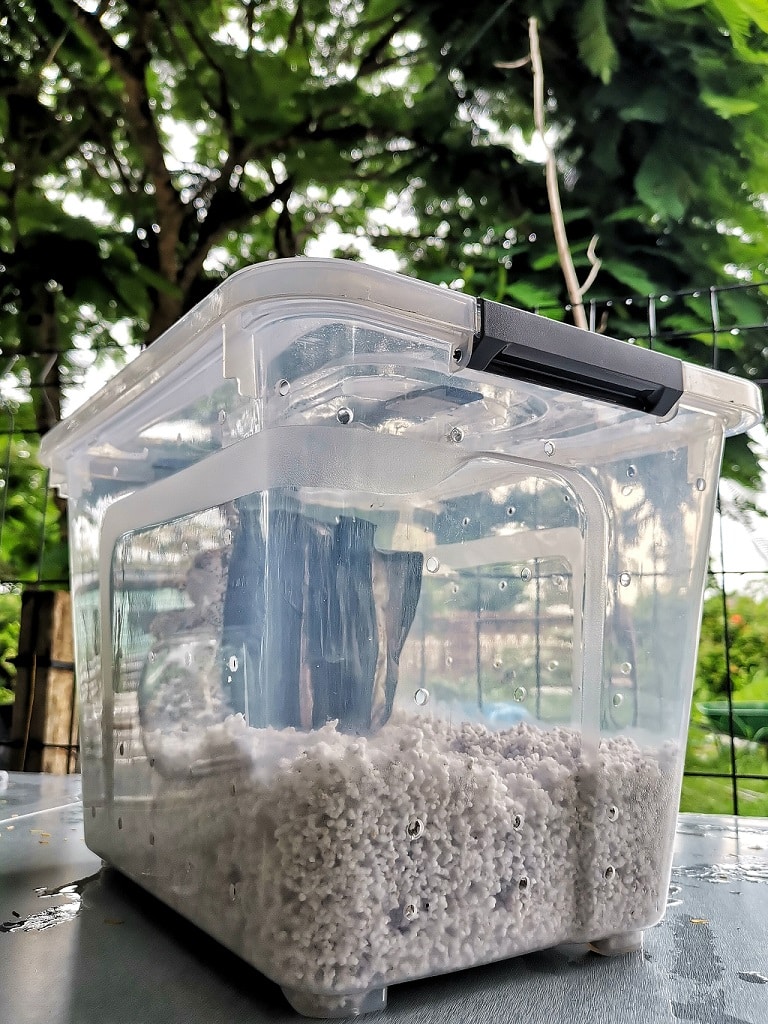
- Take your 16-quart clear container and drill holes all around it every 2 inches. You want every side of your container (including the lid) to have a grid with holes. This is vital for proper airflow and moisture control.
- In a tub or sink, add your two bags of perlite. Perlite will help your container remain humid by helping with water retention.
- Add water to your container to dampen your perlite. You want to add just enough for the perlite to be damp – you do not want water leaking through the bottom.
Step 10: BIRTH, DUNK, AND ROLL YOUR CAKES
- Wash your hands thoroughly.
- Once your cakes are fully colonized with mycelium, remove them from your jars.
- Place your cakes in a large container with a lid, or a bowl, and fill with cold water. Let your cakes soak for 12 hours.
- Your cakes will float, so make sure you weigh them down with something like a plate or a lid.
- This step will help rehydrate your cakes and provide the proper environment for their growth.
- After 12 hours, remove your cakes from the water and roll them in fresh vermiculite to seal in the moisture.
Step 11: INTRODUCE YOUR CAKES TO THE FRUITING CHAMBER
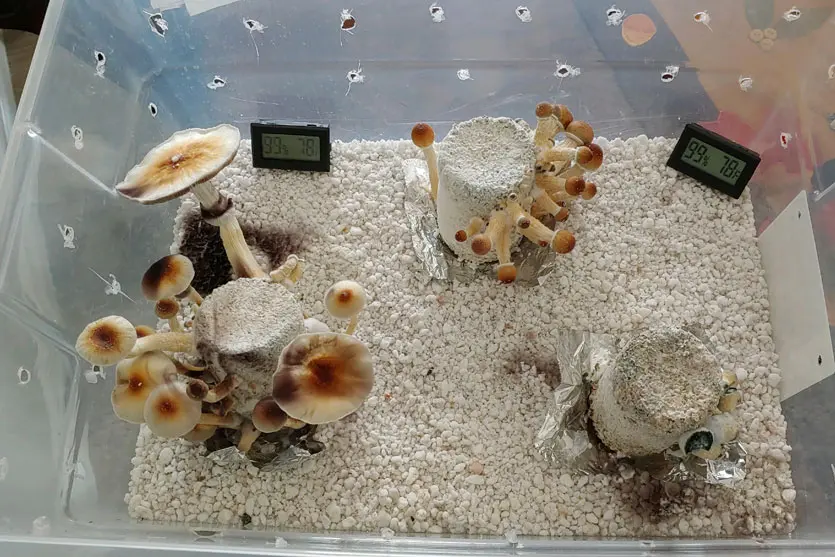
- Add your dunked and rolled cakes to your perlite chamber. Place them neatly with 2-4 inches of space between each other.
- For the next 4-8 weeks, your goal is to keep this fruiting chamber humid and warm (around 23.3°C – 24.4°C / 74°F – 76°F). You can have success growing them in a place without natural light (like a closet), but you will need to introduce artificial light to simulate 12 hours of daylight and 12 hours of nighttime. If you have the space and privacy in your home, it is best to place them somewhere where indirect light will hit them. If you place them under direct heat, the environment will be too warm.
- What I personally do is spray down the walls of the chamber using a misting bottle. Then from around 12-24 inches above the chamber, I mist downward so the water hits the cakes indirectly. Do not directly spray your cakes.
- Using your container’s lid, fan the chamber for 10-20 seconds. Do this twice – thrice a day.
- To make your life easier, simply buy a hygrometer (measures humidity) from your local pet shop – a thermometer can help, too. Maintain your humidity above 75%.
- I misted when I woke up, around lunch time, and before I went to bed and had no issues. I fanned my fruiting chamber 4 to 5 times a day.
Step 12: WAIT FOR MUSHROOMS TO FRUIT
- Depending on your type of mushroom and variant, fruiting time varies. You may start little baby mushrooms growing in about 5-10 days. Ensure you keep the chamber humid. If your cakes were fully colonized, you shouldn’t worry too much about contamination, as mycelium is pretty resistant. But just keep an eye for any signs of mold or bacteria.
- Your cakes may turn blue if you are misting too often – this is normal, as the blue indicates the presence psilocybin. Simply reduce your misting.
- If you spot black spots on your cakes and the black transfers to a cotton swab, then mold may be growing. Dispose of the contaminated cake and disinfect your chamber to prevent contamination.
- If your mushrooms are growing white fuzz at the base, this is normal and is due to improper airflow. Fan more frequently, or get a low-speed fan on a timer.
- This sounds very tedious, but I swear it’s not. It is pretty low-maintenance once you get into the rhythm of things.
Step 13: HARVEST YOUR MUSHROOMS
- In about 2-3 weeks, you will be able to do your first harvest. You need to harvest per cake and not by the whole batch. This means, if one cake has mushrooms ready to harvest, then do so without waiting on other cakes to catch up.
- Harvest your mushrooms right after the veil breaks. There will be a veil remnant around the top part of the stem indicating the veil broke. Do it in the beginning phase of this.
- What I do is gently twist the mushroom off the cake – do not yank it out – to prevent damaging the mycelium. They will come off pretty easily.
- You don’t have to wash your mushrooms. I cut off the bottom of the mushrooms that contain little bits of vermiculite and perlite because I don’t want to ingest that.
Step 14: DUNK YOUR CAKES IN WATER
- After 1-2 harvests, dunk your cakes in water for 6-8 hours to rehydrate them and promote more growth. Place back in your fruiting chamber. You will be able to get 3 flushes (cycles) out of your cakes. Maybe
Step 15: DEHYDRATE YOUR MUSHROOMS
- To ensure your mushrooms last a long time, dehydrate them. This can be easily done with a dehydrator. There are cheap ($30-$40) dehydrators that do the job just fine. Dehydrate them at the lowest temperature (90-95°F) for 12 hours. Some people use an over at the lowest temperature for 1 – 2 hours, but I do not trust that, as most ovens cannot get to a low enough temperature. Doing this runs the risk of inactivating the psilocybin. Some dehydrate by using large fans and leaving them blowing in front of the mushrooms for 24 hours. This is tedious and overstimulating for me, so a dehydrator is much, much easier. Trust me…get the dehydrator.
Step 16: STORE YOUR MUSHROOMS
- I store my mushrooms in pint-sized mason jars with 2-3 silica packets inside (to prevent moisture) in the freezer. These will last you years. Make sure that your mushrooms are cracker dry though! You do not want any moisture to remain in them!
- And you’re done! Congratulations! You just learned how to grow magic mushrooms! Easy!
- Your yield depends on your variant and species of mushroom, but you can estimate to get about 1oz (28grams) of mushrooms per 1qt of substrate. My last grow of 12 ½-pint mason jars yielded me 108 grams of dried mushrooms.
Frequently Asked Questions
The process takes 2-3 months.
There are many factors that affect yield size. These include your fruiting conditions, the type of mushroom you’re growing, humidity, ventilation, etc. You can expect anywhere from 2-7 grams of mushrooms per cake per flush. You will see a decrease in yield after your second flush.
Dispose of it. It is not worth saving it, as it may contaminate all your other cakes whenever you bring them together in the fruiting chamber. Mold spores are microscopic and can easily spread through the air, so don’t even open the contaminated jar.
This happens when the cakes are getting too much water directly on them, or after a couple of flushes. This won’t cause any harm to you or your mushrooms. Try not to directly mist your cakes, but rather spray from 12-24 inches abovce the fruiting chamber so a light mist falls on them, rather than droplets of water.
Two things may be at play here: mushroom spores or mold. If your mushrooms’ veils break, you will often notice a layer of black around the surrounding area. This is normal — your mushroom simply reached maturity and was ready to reproduce, as if it were in nature. If the black is not as widespread, but rather focused on one specific part of your cake then it may be mold. Any other type of coloration outside the normal spore dispersal or blue staining should be treated as contamination.
Yes, this is fine. This happens when there is sub-optimal fresh air exchange, but it is no issue. This is safe.
You will be harvesting a lot of mushrooms, so unless you’re going to be consuming them all within the week, it is best for you to dry them. Drying your mushrooms takes out all the moisture, so they do not spoil and begin rotting. If you want to keep your mushrooms fresh and edible for a long time, then make sure you dry them until they are cracker dry in a dehydrator. Place silica packets in whatever container you store them in to prevent any moisture from forming.
Right before the veil breaks or right after is the optimal time. Preferably, don’t wait longer than a day after the veil breaks.
Whenever you start noticing your cakes getting brittle, not producing mushrooms, or growing mold, then that means they are done. You can dispose of them. If you have a flower box / garden, you could try dispersing the exhausted cake (if it doesn’t have mold) into your soil for added nutrients. Sometimes, nature will find a way to and you will be surprised to find a few little mushrooms growing in your garden. Again, this may or may not happen, but it doesn’t hurt to try.
For the most part, yes. You can grow from magic mushrooms to functional, edible mushrooms. There are some mushrooms that require different substrates other than brown rice flour. Some grow best in manure, bird feed, grain, etc. Some mushrooms require stricter environmental conditions to be met (such as higher humidity, a certain temperature, certain air flow, etc.) But for beginner mushrooms, this tek will do just fine. Do your research for your specific type of mushroom that you plan on growing to see if they are beginner friendly.
Mushrooms need an optimal temperature around room temperature to grow. If your house is below this, then you may stall or completely inhibit growth. You can work around this by buying a heating pad (like the type used inside reptile terrariums) and using it to warm your fruiting chamber. Make sure you keep your environment humid.
Disclaimer: Psychedelic Spotlight does not condone the use of illegal substances. Growing magic mushrooms is illegal in most jurisdictions. The purpose of this article is for educational and harm reduction purposes only. If you suffer from a medical or mental condition, please consult with your doctor before taking any substance.


